Want to post this so I don't lose it. A GREAT recipe for pattipan squash:
http://www.foodrenegade.com/buttery-patty-pan-squash-with-basil-recipe/
Leftover chicken? Easy Chicken Crescents Recipe
- 2 cups cubed, cooked chicken
- 3 oz cream cheese
- 2 tbsp butter
- 2 tbsp milk
- 2 tbsp chopped onion
- 1 package pillsbury crescent rolls
- pinch salt
- 2 tbsp melted better
- shredded cheese (or cheese croutons!)
- 2 cups cubed, cooked chicken (~3 chicken breasts)
- 3 oz cream cheese
- 2 tbsp butter
- 2 tbsp milk
- 2 tbsp chopped onion
- 1 package pillsbury crescent rolls
- pinch salt
- 2 tbsp melted better
- shredded cheese (or cheese croutons!)

Cold Weather Chili
It seems that each part of the country has particular likes and dislikes when it comes to Chili. Some like it hot, some do not. Some like beans, some do not. Some like it sweet, some savory. I say this because you need to find your own "style" when it comes to chili according to what you and your family prefer. This is my style. Less meat, more vegetables. A bit of heat, but only enough to remind you that it's Chili. I'll call it New England Style Chili.
NEW ENGLAND STYLE CHILI
2 large onions, peeled and roughly chopped
2 green peppers, roughly chopped
5-6 stalks celery, roughly chopped, leaves included
4-5 carrots, peeled and diced
2 cloves of garlic, minced (or 2 tsp minced garlic from jar)
2 tbsp olive oil (or vegetable or canola oil)
1 lb. ground beef, (85% lean is good)
3 28oz cans crushed tomatoes
1 can (3 oz?) chopped green chilis such as "Old El Paso"
3 16 oz cans beans (kidney, black, chili, soy or any combination)
2 cups beef broth (or use 2 beef bouillion cubes and 2 cups water)
2 tbsp sugar
2 tbsp tomato paste
1/4 cup cumin
1/4 cup chili powder
2 tbsp oregano
1 tsp salt
1 tsp black pepper
Preparation:
Peel and chop all vegetables. Open cans of tomatoes. Open cans of beans and place beans in a colander and rinse (unless they are canned in chili sauce). Get out all spices and sugar.
Options:
Despite going grocery shopping this morning (sigh), I had only one small green pepper to add to my chili. I opted to use chopped washed leeks, which will add a nice onion flavor. I also added a small can of diced green chilis and about 2 cups of diced turkey (leftover from Thanksgiving and needed to be used up NOW) in addition to the ingredients listed above.
DIRECTIONS:
Add oil to LARGE stockpot and, once oil is hot, add chopped vegetables, including garlic. Let cook, stirring frequently, for about 5 minutes.
 Add ground beef, breaking meat "clumps" up with spoon as best you can. Lower heat to medium and continue to cook (and break meat up) until all pink of meat is gone.

Add canned tomatoes, tomato paste and beef broth (if using bouillon, dissolve 2 beef bouillon cubes in 2 cups boiling water before adding to pot). Stir well. Maintain heat so mixture soon comes to a very low boil - or simmer. (Steam will be coming from the top and you will see occasional bubbles in the mixture. You do not want it so hot it maintains a constant bubbly boil.)

Add spices (oregano, cumin, chili powder, salt, pepper) - you might want to try half the quantity of what I've stated in the recipe to start, then adjust to your own personal taste after the chili has been cooking for an hour or so. Do NOT add any spice with heat yet! The longer "hot" spices simmer, the hotter they get.
Loosely cover pot (leave about a one-quarter to one-half inch space between cover and pot on one side), adjust heat (probably down) to maintain simmer, and let mixture simmer for at least 90 minutes, stirring every 15 minutes. When you stir, use a spoon long enough to get down to the bottom of the pot (or you'll have burned chili on the bottom, which will give an overall burned flavor to the rest).
Chili is one of those dishes that requires a long, slow simmer time to develop all the flavors. Don't be in a hurry!

After 90 minutes (or 2 hours or 3 hours), it's time to add in the beans.
You want to use canned beans, not dry beans in a bag. You can use one or a mixture of types of beans. In this batch I used kidney beans, white northern beans, and a can of "chili beans in sauce" because that's what I had in the pantry. I also like to use black beans and soy beans (soy beans take on the flavor of whatever they're being cooked with). If you're using any bean NOT labelled "in chili sauce" or "for chili", you want to put the beans in a colander and rinse with cold water to get rid of the thick bean "juice" that comes in the can. This also eliminates some of the high sodium found in canned products. You can use less or more beans, depending on how you like your Chili.
After adding the beans, add in the sugar, and give it all a good stir. Return the cover (loosely!) and let simmer for at least another hour. Again, stir every 15 minutes or so -- right down to the bottom of the pan.
NOTE: You add the sugar to the chili because tomatoes have a very high acid content and, despite being a "sweet" vegetable (fruit, actually), the high acid can be overpowering. You don't want to use a lot of sugar because then the sugar will overpower the tomato flavor! Rule of thumb is 1 tsp. of sugar per 28 oz can of tomatoes. This works in spaghetti sauce as well.
It's taste time. Put a spoonful of the chili mixture in a bowl and let it cool slightly. You can't determine flavors if your mouth and tongue is being burned! Add more spices to your taste. I personally like quite a lot of Cumin. Cumin is the spice you smell when you eat Tacos at a restaurant. It's got a bit of a smoky flavor to it. This, combined with the traditional chili powder and oregano, give chili it's chili flavor! If you like more "heat" to your chili, add a FEW drops of hot sauce, or 1/2 tsp of cayenne pepper or 1 tsp of ground red pepper flakes. Start slow, because you can always add more, but it's very difficult to take that "heat" out.
Once you get your flavors where you want them, let the mixture simmer for another 30 minutes or so.

Today, I served our chili with Cheeze-It crackers and sour cream. I normally serve it with grated cheddar cheese but I didn't pick any up at the store because I thought we had some -- turns out we didn't. I thought the crackers would give the dish some crunch and some cheese flavoring - and I was right. When my husband tried this dish, he asked why it took me 30 years to find out Cheeze-Itz are the perfect topping for Chili!
NEW ENGLAND STYLE CHILI
2 large onions, peeled and roughly chopped
2 green peppers, roughly chopped
5-6 stalks celery, roughly chopped, leaves included
4-5 carrots, peeled and diced
2 cloves of garlic, minced (or 2 tsp minced garlic from jar)
2 tbsp olive oil (or vegetable or canola oil)
1 lb. ground beef, (85% lean is good)
3 28oz cans crushed tomatoes
1 can (3 oz?) chopped green chilis such as "Old El Paso"
3 16 oz cans beans (kidney, black, chili, soy or any combination)
2 cups beef broth (or use 2 beef bouillion cubes and 2 cups water)
2 tbsp sugar
2 tbsp tomato paste
1/4 cup cumin
1/4 cup chili powder
2 tbsp oregano
1 tsp salt
1 tsp black pepper
Preparation:
Peel and chop all vegetables. Open cans of tomatoes. Open cans of beans and place beans in a colander and rinse (unless they are canned in chili sauce). Get out all spices and sugar.
 |
| Green pepper, onion, celery |
 |
| Leeks and carrots (both optional) |
Options:
Despite going grocery shopping this morning (sigh), I had only one small green pepper to add to my chili. I opted to use chopped washed leeks, which will add a nice onion flavor. I also added a small can of diced green chilis and about 2 cups of diced turkey (leftover from Thanksgiving and needed to be used up NOW) in addition to the ingredients listed above.
DIRECTIONS:
Add oil to LARGE stockpot and, once oil is hot, add chopped vegetables, including garlic. Let cook, stirring frequently, for about 5 minutes.


Add canned tomatoes, tomato paste and beef broth (if using bouillon, dissolve 2 beef bouillon cubes in 2 cups boiling water before adding to pot). Stir well. Maintain heat so mixture soon comes to a very low boil - or simmer. (Steam will be coming from the top and you will see occasional bubbles in the mixture. You do not want it so hot it maintains a constant bubbly boil.)

Add spices (oregano, cumin, chili powder, salt, pepper) - you might want to try half the quantity of what I've stated in the recipe to start, then adjust to your own personal taste after the chili has been cooking for an hour or so. Do NOT add any spice with heat yet! The longer "hot" spices simmer, the hotter they get.
Loosely cover pot (leave about a one-quarter to one-half inch space between cover and pot on one side), adjust heat (probably down) to maintain simmer, and let mixture simmer for at least 90 minutes, stirring every 15 minutes. When you stir, use a spoon long enough to get down to the bottom of the pot (or you'll have burned chili on the bottom, which will give an overall burned flavor to the rest).
 |
| Loosely cover pot, simmer 90 minutes at least. |
Chili is one of those dishes that requires a long, slow simmer time to develop all the flavors. Don't be in a hurry!

After 90 minutes (or 2 hours or 3 hours), it's time to add in the beans.
You want to use canned beans, not dry beans in a bag. You can use one or a mixture of types of beans. In this batch I used kidney beans, white northern beans, and a can of "chili beans in sauce" because that's what I had in the pantry. I also like to use black beans and soy beans (soy beans take on the flavor of whatever they're being cooked with). If you're using any bean NOT labelled "in chili sauce" or "for chili", you want to put the beans in a colander and rinse with cold water to get rid of the thick bean "juice" that comes in the can. This also eliminates some of the high sodium found in canned products. You can use less or more beans, depending on how you like your Chili.
After adding the beans, add in the sugar, and give it all a good stir. Return the cover (loosely!) and let simmer for at least another hour. Again, stir every 15 minutes or so -- right down to the bottom of the pan.
NOTE: You add the sugar to the chili because tomatoes have a very high acid content and, despite being a "sweet" vegetable (fruit, actually), the high acid can be overpowering. You don't want to use a lot of sugar because then the sugar will overpower the tomato flavor! Rule of thumb is 1 tsp. of sugar per 28 oz can of tomatoes. This works in spaghetti sauce as well.
It's taste time. Put a spoonful of the chili mixture in a bowl and let it cool slightly. You can't determine flavors if your mouth and tongue is being burned! Add more spices to your taste. I personally like quite a lot of Cumin. Cumin is the spice you smell when you eat Tacos at a restaurant. It's got a bit of a smoky flavor to it. This, combined with the traditional chili powder and oregano, give chili it's chili flavor! If you like more "heat" to your chili, add a FEW drops of hot sauce, or 1/2 tsp of cayenne pepper or 1 tsp of ground red pepper flakes. Start slow, because you can always add more, but it's very difficult to take that "heat" out.
Once you get your flavors where you want them, let the mixture simmer for another 30 minutes or so.

Today, I served our chili with Cheeze-It crackers and sour cream. I normally serve it with grated cheddar cheese but I didn't pick any up at the store because I thought we had some -- turns out we didn't. I thought the crackers would give the dish some crunch and some cheese flavoring - and I was right. When my husband tried this dish, he asked why it took me 30 years to find out Cheeze-Itz are the perfect topping for Chili!
The BEST (and easiest) BBQ Pork Ribs
I have never served these ribs without receiving lots of ooooh's and ahhhhhh's over them. Easy to fix, no grill needed, but guests will think you slaved away in the kitchen for hours.
 INGREDIENTS
Pkg of Pork Loin Back Ribs
1/4 cup water
Fresh or dried Rosemary
Garlic Powder
Your favorite BBQ Sauce*
DIRECTIONS
Use bottom of a broiler pan or any large baking pan that has sides to it (in case the foil leaks, you don't want meat juices baking on the bottom of your oven!). Lightly spray pan with Pam spray.
Tear off two sheets of heavy duty aluminum foil, each about 6-8 inches longer than your rack of ribs. Along the long side, fold the two pieces of foil together (fold over twice) to create one large sheet of foil. Again, lightly spray with Pam Spray.
Remove ribs from package. Rinse gently under cold water (I always rinse any meat that has been sitting in it's own juice). Place ribs in center of foil on top of pan. Lightly sprinkle with Garlic Powder and Rosemary. Do NOT salt at this time. Flip the ribs over and repeat. When you're done, you want the meaty side of the ribs UP, as shown. Pour the 1/4 cup of water around the edges of the ribs on the foil (not on the meat itself as your spices will wash off).

Loosely pull foil up along the long sides and fold over 2 or 3 times. Then fold in each end 2 or 3 times. It's important the foil not be wrapped tightly around the ribs as the extra space allows the ribs to steam.
Bake in 300 degree oven for about 2 hours. At the end of that time, open up the foil along the top of the ribs and pour your favorite BBQ sauce over the ribs -- be generous! Return ribs to oven for another 20-30 minutes, or until they are fork tender.
I usually serve these with a baked potato (which you can put in the oven when the ribs have 45 minutes to go) and green tossed salad, or sometimes corn on the cob.
*In Cincinnati, the ONLY BBQ sauce for ribs is Montgomery Inn Barbecue Sauce . Seriously. It's so popular that it's sold not just in the Montgomery Inn itself, but in almost all grocery stores. It's a sweet sauce that has a vinegar base but not an overwhelming vinegar tartness. If you ever see it on your grocer's shelves, grab some!

Pkg of Pork Loin Back Ribs
1/4 cup water
Fresh or dried Rosemary
Garlic Powder
Your favorite BBQ Sauce*
DIRECTIONS
Use bottom of a broiler pan or any large baking pan that has sides to it (in case the foil leaks, you don't want meat juices baking on the bottom of your oven!). Lightly spray pan with Pam spray.
Tear off two sheets of heavy duty aluminum foil, each about 6-8 inches longer than your rack of ribs. Along the long side, fold the two pieces of foil together (fold over twice) to create one large sheet of foil. Again, lightly spray with Pam Spray.
Remove ribs from package. Rinse gently under cold water (I always rinse any meat that has been sitting in it's own juice). Place ribs in center of foil on top of pan. Lightly sprinkle with Garlic Powder and Rosemary. Do NOT salt at this time. Flip the ribs over and repeat. When you're done, you want the meaty side of the ribs UP, as shown. Pour the 1/4 cup of water around the edges of the ribs on the foil (not on the meat itself as your spices will wash off).

Loosely pull foil up along the long sides and fold over 2 or 3 times. Then fold in each end 2 or 3 times. It's important the foil not be wrapped tightly around the ribs as the extra space allows the ribs to steam.
 |
| Fold foil loosely around ribs |
 | |
| Perfection! |
*In Cincinnati, the ONLY BBQ sauce for ribs is Montgomery Inn Barbecue Sauce
10 minute Any Fruit Pie
I had some over ripe pears I needed to use up this morning, so thought I'd make a fast mixed fruit "tart". I'm not exactly sure what you'd call this - it's a pie without a structured pie shell.
The three pears I have aren't quite enough for a substantial filling (and, honestly, so mushy they will just turn to Pearsauce in the pie), so I raided my fruit drawer and found a nice tart Granny Smith apple and about 1/2 cup of ripe raspberries. You can also use peaches, any apples and add raisins, craisins, chopped nuts. It's definitely a recipe you can use to empty your pantry of over-ripened fruit!
INGREDIENTS
3 ripe pears (any fruit that makes a good pie)
1 Granny Smith Apple
1/2 cup fresh raspberries
1/4 cup flour
1/8 cup sugar (brown or white)
1 tsp cinnamon
1/4 tsp salt
1/2 tsp pumpkin pie spice (optional)
2 tbsp butter
1 refrigerator pie crust (or make your own)

NOTES: The more ripe the fruit, the larger you should cut it for your "pie" and the more flour you should add to the recipe. Over-ripe fruit will tend to turn to fruit sauce, so the flour helps the fruit hang on to its shape and thicken any sauce. In my case the Granny Smith apple is very firm, while the pears are very soft, so I cut the apple in much thinner slices than the pears, to try and even out the cooking time of both fruits.
I love Pumpkin Pie Spice! It has a hint of cloves and nutmeg as well as cinnamon. There's also a mixed spice called "Apple Pie Spice" which I also use frequently in recipes that call for plain cinnamon.
My photo includes a container of applesauce. Ignore it. I normally add applesauce to any apple pie I make just to add that saucy filling, but once I cut into the pears and realized how "mushy" they were, I decided the applesauce wasn't necessary.
DIRECTIONS:
Remove pre-made refrigerator pie dough from the fridge about 15 minutes ahead of time. This gives it time to warm up and makes it easier to handle. (Instructions are on the box to warm it up with microwave, but I find it handles better if I just let it warm up to room temp on its own.)
Preheat oven at 425 degrees.
Pare off skin from pears and apple. Cut pear and apple into slices/chunks (see NOTES above), trying to keep the fruit cut uniformly so it will cook evenly.
In a mixing bowl, add fruit, salt, sugar, spices, and flour and gently stir/toss to coat the fruits in the flour. Don't STIR because this will break the fruit into small pieces. Just gently toss it until the fruit is coated.

Lightly Pam-spray your cookie sheet. Emphasis on the "lightly".
Unroll your pie crust to lay flat on the cookie sheet. (I next sprinkled the crust with a cinnamon sugar mixture but this is optional.).
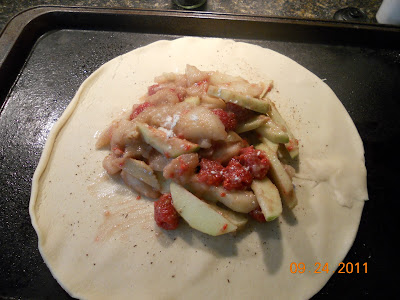
Spoon your fruit ingredients into the center of the pie crust.
Cut the butter up into small pieces and place randomly on top of the fruit.
Pull up the pie crust all around the fruit, leaving an open area at the top.

Until it looks like this:

Bake in oven for 20 minutes (more if ALL your fruit is firm. For example, if you use all firm apples, I'd bake it for 35 minutes), then switch your oven OFF and leave tart in the oven for another 15 minutes.
Cool for at least 20 minutes and serve! Delicious slightly warm served with vanilla ice cream or whipped cream.

The three pears I have aren't quite enough for a substantial filling (and, honestly, so mushy they will just turn to Pearsauce in the pie), so I raided my fruit drawer and found a nice tart Granny Smith apple and about 1/2 cup of ripe raspberries. You can also use peaches, any apples and add raisins, craisins, chopped nuts. It's definitely a recipe you can use to empty your pantry of over-ripened fruit!
INGREDIENTS
3 ripe pears (any fruit that makes a good pie)
1 Granny Smith Apple
1/2 cup fresh raspberries
1/4 cup flour
1/8 cup sugar (brown or white)
1 tsp cinnamon
1/4 tsp salt
1/2 tsp pumpkin pie spice (optional)
2 tbsp butter
1 refrigerator pie crust (or make your own)

NOTES: The more ripe the fruit, the larger you should cut it for your "pie" and the more flour you should add to the recipe. Over-ripe fruit will tend to turn to fruit sauce, so the flour helps the fruit hang on to its shape and thicken any sauce. In my case the Granny Smith apple is very firm, while the pears are very soft, so I cut the apple in much thinner slices than the pears, to try and even out the cooking time of both fruits.
I love Pumpkin Pie Spice! It has a hint of cloves and nutmeg as well as cinnamon. There's also a mixed spice called "Apple Pie Spice" which I also use frequently in recipes that call for plain cinnamon.
My photo includes a container of applesauce. Ignore it. I normally add applesauce to any apple pie I make just to add that saucy filling, but once I cut into the pears and realized how "mushy" they were, I decided the applesauce wasn't necessary.
DIRECTIONS:
Remove pre-made refrigerator pie dough from the fridge about 15 minutes ahead of time. This gives it time to warm up and makes it easier to handle. (Instructions are on the box to warm it up with microwave, but I find it handles better if I just let it warm up to room temp on its own.)
Preheat oven at 425 degrees.
Pare off skin from pears and apple. Cut pear and apple into slices/chunks (see NOTES above), trying to keep the fruit cut uniformly so it will cook evenly.
 |
| Notice over-ripe pears are cut in larger chunks than firm apples. |
In a mixing bowl, add fruit, salt, sugar, spices, and flour and gently stir/toss to coat the fruits in the flour. Don't STIR because this will break the fruit into small pieces. Just gently toss it until the fruit is coated.

Lightly Pam-spray your cookie sheet. Emphasis on the "lightly".
Unroll your pie crust to lay flat on the cookie sheet. (I next sprinkled the crust with a cinnamon sugar mixture but this is optional.).
Spoon your fruit ingredients into the center of the pie crust.

Cut the butter up into small pieces and place randomly on top of the fruit.
Pull up the pie crust all around the fruit, leaving an open area at the top.

Until it looks like this:

Bake in oven for 20 minutes (more if ALL your fruit is firm. For example, if you use all firm apples, I'd bake it for 35 minutes), then switch your oven OFF and leave tart in the oven for another 15 minutes.
Cool for at least 20 minutes and serve! Delicious slightly warm served with vanilla ice cream or whipped cream.

Corn Bread in a Hurry
I know many people cook from scratch, as I do on occasion. But when dinner is due in 30 minutes and you want a little something special and you want to make sure it comes out perfectly, I have no qualms about using a mix. This little box of "Jiffy Cornbread Mix" is often on sale for .35 to .50 a box, so I stock up. It's a good simple basic cornbread when you follow the package directions, but here's a way to make it just that much more special and tasty.
 CORN BREAD IN A HURRY
1 box Jiffy Cornbread mix
1 egg
1/3 cup milk
1 tbsp sugar
1 tsp vanilla extract
Preheat oven to 400.
Put all ingredients in a small mixing bowl and mix well by hand. Do not overstir. There will be some small lumps in batter.
Use pans of your choice. I sometimes use an 8 inch round cake pan, muffin tins (with paper baking cups) or, as you can see by this picture, little bread pans. If you are not using paper baking cups, spray the pan generously with Pam Spray.
Divide batter between the pans, filling up about half way. Use a paper towel to wipe off an spills or drips on the top of the pans (easier to clean later).

Let the batter REST for about 10 minutes. This is key to good corn bread!
Place pan in preheated oven, cook for about 15 minutes or until nicely golden with a slight brown edge.
Remove from oven (turn oven OFF) and lightly spread butter on the top of each cooked "cake". Put back in oven until butter is melted. Remove from oven.
Let cool in pan for about 10 minutes, then let cool on a cake rack for another 10 minutes. (If you eat corn muffins too soon out of the oven, they will crumble.)

Five minute Breakfast Burrito
I fix breakfast for my husband every weekday morning. On those mornings he's hit the "snooze" button a few too many times, I need a breakfast he can grab and eat on his way to work. This "cooked in the microwave" Breakfast Burrito is my solution.
BREAKFAST BURRITO
Ingredients
1 8-inch flour tortilla
1 egg
1 tsp water
2 Brown n' Serve sausages
1 slice American or Cheddar cheese
According to package directions, cook your sausages in the microwave and cool slightly. Split in half, lengthwise.

Crack egg into a small container (I use a microwavable measuring cup) with water, and whisk with a fork until thoroughly mixed. (Do NOT add salt until eggs are cooked!) Place in microwave and set to cook on High for 1 minute. After 20 - 25 seconds (when eggs are about half-cooked), open up microwave and whisk the eggs again, mixing the cooked in with the uncooked. Return to microwave and cook until desired consistency - about 15 to 20 more seconds.

Assemble your Breakfast Burrito by putting the slice of cheese on first (I didn't have sliced American, so used a few slices of sharp cheddar), topped with the split sausages, then adding the scrambled eggs. Salt and pepper to taste.

Roll the up as you would a Burrito. Return it to the microwave for 10 seconds on High - just enough to melt the cheese and re-heat the sausage.

Wrap in aluminum foil by folding up one end, then two sides, leaving one end to fold over last. This makes it easier to open and eat from one end in the car!

Put a fresh cup of coffee in a travel cup, hand him a napkin and his Breakfast Burrito, and he's on his way!
The cost of this filling breakfast? About 43 cents!
Subscribe to:
Posts (Atom)